Brazilian · appetizer
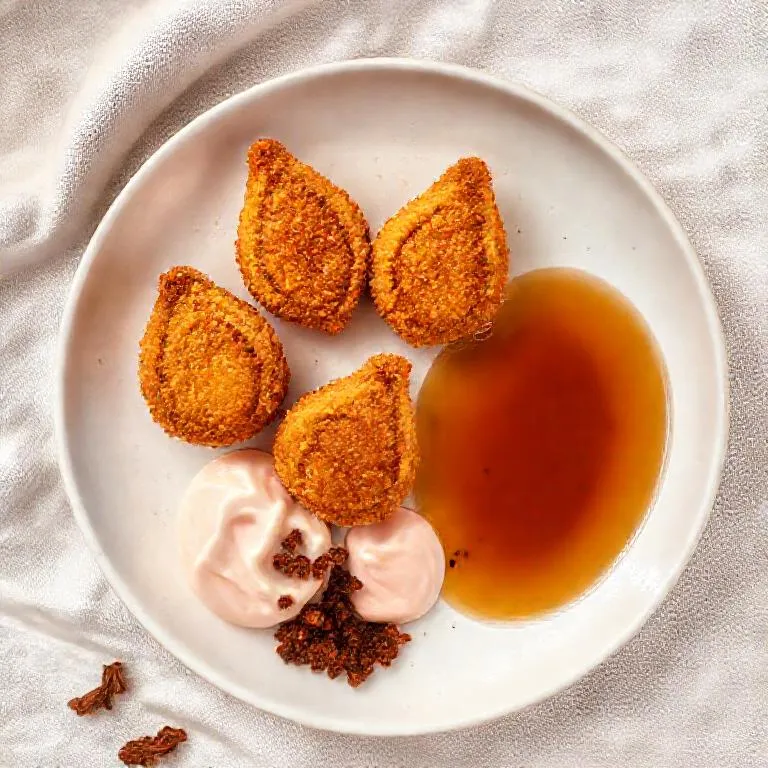
Coxinha Brazilian Chicken Croquettes A Brazilian chicken croquette made with confit chicken filling, potato dough, thyme bundles, and served with pink pepper mayo, chicken skin crumble, and tapioca broth.
servings 40 Original recipe on julescooking.com
Keep this recipe Add a copy of Coxinha Brazilian Chicken Croquettes to your Saucepan library.
Save it to your library Sign in to keep a copy you can scale, cook from and add to your grocery list.
Back to 40 servings 2 chicken legs goose fat or sunflower oil 5 clove garlic 1 onion 2 g curry powder 5 g chives 100 g cream cheese
Steps Clear checks Tap an ingredient or step to check it off.
1 Step 1: Take the chicken legs and start by remove the skin. Keep the skin in your fridge for later. Now season the legs with salt on both sides. Then transfer the legs into a pan and cover them with sunflower oil or melted goose fat. Goose fat does have a lot more flavor, but it’s a bit harder to find in a normal grocery store.2 Step 2: Now also add 3 cloves of garlic that are cut in half and then bring the oil to a simmer. Then turn down the heat to the lowest setting for around 3 hours. The chicken is done when the meat is falling off the bone.3 Step 3: Once it’s cooked take the chicken out of the oil and clean the meat of the bones. Then set the chicken aside for later.4 Step 4: After that take the onion, cut it in half and clean it. Now chop it. It doesn’t need to be super precise, a nice dice is fine. Then add a drizzle of oil to a hot pan and add the onion. Now take the remaining two cloves of garlic and cut it fine as well. Add them to onion and season both with some salt.5 Step 5: Once it starts to color add the curry powder and pan fry it for another 2 minutes. Then turn off the heat.6 Step 6: Meanwhile cut the chives fine. Don’t cut it to fine, you want to keep some texture. Add it to the pan with the confit chicken meat and the cream cheese.7 Step 7: Now you can mix it by hand or as I prefer with a hand mixer. This saves so much time. Then cover it and let it cool down in your fridge.8 Step 8: Once cold roll the filling into balls that are around 10 to 12 grams. Then keep them in your fridge for later.9 Step 9: First peel the floury potato and then cut 160 grams into even sized pieces. Submerge them in cold water and season with a generous amount of salt. Then bring this to a boil and boil till the potatoes are fully cooked.10 Step 10: After that drain the water and let them steam dry for 5 minutes.11 Step 11: Once dry and still hot press the cooked potato through a fine sieve using a ladle or a spatula.12 Step 12: Now add the chicken stock, the butter and the salt. While stirring bring this to a boil. Then add the flour and cook the mixture for 3 to 4 minutes. Be sure to keep on mixing to create a nice and even dough.13 Step 13: Then transfer it into a bowl, cover it and let it cool down out of the fridge.14 Step 14: While it’s cooling down, we can make the little thyme bundles. These are option, but I think it really gives a nice touch. For this bind some sprigs of thyme together and cover the bundle twice. Be sure to use cooking rope and not any synthetic rope. This will melt when deep frying.15 Step 15: Then take the cooled down dough and make little discs of around 15 to 17 grams. Place a chicken ball in the middle and gently form the dough together to create the signature drop shape. Be sure it’s completely airtight.16 Step 16: Now place a thyme bundle in every Coxinha and press it together so the bundle stays in place.17 Step 17: Then we can bread crumb them. First cover the dough with a layer of flour, then a layer of beaten egg and finally a layer of breadcrumbs. You can also use panko, but here I use breadcrumbs.18 Step 18: I you like a thick crispy layer add another layer of egg and breadcrumbs. I only added one layer. Then keep them in your fridge for later.19 Step 19: Take the chicken skin and place it on a silicon sheet. Season it with salt and place another sheet on top.20 Step 20: Then add another metal tray and bake it at 160 °C ( 320 °F ) for 40 to 45 minutes till golden brown and crispy.21 Step 21: Now let it cool down and then chop it into a fine crumble. Spread it on a kitchen paper and then keep it dry and covered for later.22 Step 22: Mix the egg yolk with the pink pepper, the mustard, the wasabi, the tabasco, the lime juice and the salt. Now blend this till smooth.23 Step 23: Then add the neutral oil and blend it till fully emulsified. After that transfer it into a piping bottle and keep it in your fridge for later.24 Step 24: First boil the tapioca pearls in some salted water for 10 minutes. Be sure it’s a soft boil, otherwise the pearls might break.25 Step 25: Then drain the water and transfer the pearls into a bowl. Directly add the ponzu, the sambaizu, the soy sauce and the chicken stock.26 Step 26: Then gently mix it and let it set in your fridge for a couple of hours. The pearls will soak up a lot of the marinade and have a beautiful rich and fresh flavor.27 Step 27: First pour the rich chicken stock in a pan and reduce it for 50%.28 Step 28: Then turn off the heat and add the ponzu, the sambaizu and the lime juice. Mix this and then season it with soy sauce. Mix it once more and then give it a taste for seasoning.29 Step 29: Then pass the broth through a fine sieve. We will serve it lukewarm but keep it in your fridge for later.30 Step 30: Heat up the broth and then deep fry the coxinha’s at 170 °C ( 338 °F ) till golden brown. This takes around 4 minutes. I don’t deep fry the thyme bundle because it will shrink, and it might even burn.31 Step 31: Then pipe a big dot of the mayonnaise on a platgetsaucepan.com/r/3b97a108-19aa-4d92-9003-72bd9ae282bb · Original: https://julescooking.com/creations/coxinha-with-pink-pepper-chicken-skin/
What Saucepan does Free on iPhone. No ads.
Save from Instagram, TikTok or any site Tap Share on a Reel, a video or a recipe page. You get ingredients, steps, a photo and credit to the creator. Cook Mode with timers that ring One big step at a time, hands-free. Timers start from the step and ring across the room. What can I make tonight? Scan your grocery receipt and see which saved recipes you can cook with what you bought. Plan the week, shop one list Pick dinners from your own recipes and send everything to one grocery list, sorted by aisle. Share and follow Share with everyone, only friends, or anyone with the link. Follow cooks you like and post what you made. Fits your diet and allergies Set them once. Every recipe shows whether it fits and flags the one ingredient that does not, with a swap. Android is coming soon.